So my kids might be in college now (how did THAT happen??), but I’m STILL making homemade lunchables. Not for them obvi—Emma would die before eating processed meat now that she’s all environmental science-y and Ryan… well who knows what that kid eats during his 3rd major change this year. Anyway. These days I’m making these homemade lunchables for ME and sometimes James when he remembers to actually take his lunch to work instead of buying that gross hospital cafeteria food again.
Why Homemade Lunchables Changed My Lunch Game Forever
OK so last month I was standing in Target staring at the prepackaged lunchables (they were $4.79!!!!! each) and my brain was like “Lisa you absolute DUMMY, you can make these homemade lunchables yourself for like 2 bucks” and then I started doing the math and realized I’ve prolly spent enough on store-bought lunchables over the years to fund a small island nation. Or at least fix the check engine light in my Honda that’s been on since 2021 (it finally got fixed last Thursday, btw. Only took James threatening to sell the car to get me to the mechanic).
The thing about store-bought Lunchables is they’re basically just salt discs with weird meat squares that cost a fortune??? And I’m not even gonna talk about all the preservatives and junk. My body is already dealing with enough thank-you-very-much (perimenopause is NO JOKE PEOPLE).
So I decidinged to make my own homemade lunchables. And guess what? They’re SOOOOO much better.

5 Amazing Benefits of Homemade Lunchables for Busy Adults
Here’s why making your own homemade lunchables is not just for kids but actually perfect for me, a woman who regularly forgets where she put her coffee while actively drinking it:
- Save actual money with homemade lunchables (like $2+ per serving)
- No weird ingredients that sound like chemistry experiments
- Can customize your homemade lunchables for whatever diet thing you’re trying this week (I’m on attempt #4 of low-carb… it’s goin GREAAAT #sarcasm)
- Make a bunch of homemade lunchables at once when you’re feeling productive so future-you doesn’t hate present-you
- Homemade lunchables actually taste like FOOD not plastic
Essential Ingredients for Perfect Homemade Lunchables
K so the basic components of good homemade lunchables are reeeeally simple:
1. Protein Options for Homemade Lunchables
This is the main part obvi. Options include:
- Deli meat slices (I like turkey or ham, but NOT the kind James buys that’s 97% water?? Why does he always get the weird bargain meat?)
- Hard-boiled eggs (which I always, ALWAYS overcook becuz I got distracted by Instagram)
- Leftover chicken from that rotisserie you bought three days ago and forgot about
- Tuna if you want your coworkers to hate you
- Plant-protein options if you’re trying to be like Emma who now lectures me about factory farming EVERY. SINGLE. CALL.
2. Cheese Choices for Homemade Lunchables
Cheese makes everything better, especially Mondays. Options:
- Cheddar cubes (buy the block and cut it yourself instead of those pre-cut ones that cost your firstborn child)
- String cheese (yes I still eat these at 47, JUDGE ME)
- Those fancy cheese slices that James hides in the vegetable drawer thinking I won’t find them… I always do
- Laughing Cow wedges which are sooooo good with crackers when you’re stress-eating during a work Zoom
3. Carbs for Your Homemade Lunchables
Your choices:
- Crackers (whole grain if you’re being good, Ritz if you’ve given up)
- Mini pitas that are on sale
- Rice cakes if you hate yourself
- Those almond flour crackers that cost a billion dollars but make you feel superior
4. Fresh Add-ins for Homemade Lunchables
To make your homemade lunchables “healthy” or whatever:
- Grapes (I always buy too many and they go bad… why do I do this)
- Apple slices (with lemon juice if you’re fancy, or just accept the brownness like I do)
- Baby carrots (the lazy person’s vegetable)
- Cucumber slices that will inevitably get everything else wet no matter what you do
- Cherry tomatoes IF you can find ones that actually taste like tomatoes and not sad water balloons

How to Actually Assemble Homemade Lunchables Like a Pro
Here’s where ppl usually write out complicated instructions but honestly this isn’t rocket science?? But fine I’ll break down how to make homemade lunchables:
Step 1: Prep Your Homemade Lunchables Ingredients
Cut things. Wash things. Basic adult tasks that somehow feel exhausting on a Sunday night when all you wanna do is watch Yellowjackets (btw I burned dinner THREE TIMES last month because of that show, no regrets).
Step 2: Containers Are Everything for Homemade Lunchables
Get some containers with dividers! This is CRUCIAL people. Otherwise everything in your homemade lunchables gets all mixed together and soggy and sad. I got mine from Amazon after seeing an ad 57 times. #influenced
If you don’t have fancy containers just use what ya got—silicone cupcake liners inside a regular container works fine for homemade lunchables. Or separate baggies if you hate the earth (kidding! sort of!).
Step 3: Arrange Your Homemade Lunchables Like You Care (Even If You Don’t)
Put your stuff in your containers. Try to make your homemade lunchables look pretty if you care about stuff like that or just shove it in there like I usually do when I’m making these at 11pm while watching true crime documentaries.
The key is keeping wet stuff away from dry stuff. This is a HILL I WILL DIE ON after the Great Soggy Cracker Incident of 2023 (still traumatized).
Honestly tho a good rule for homemade lunchables is:
- 2 protein things
- Some cheese
- Some carbs
- At least 1 fruit/veggie so you don’t get scurvy
9 Irresistible Homemade Lunchables Ideas That Don’t Suck
I’ve tried approximately 17.5 different combos of homemade lunchables over the past few months. Here are the top ones that didn’t make me sad at lunchtime:
1. The Classic But Better
- Good ham (not the weird water ham)
- Actual cheddar cheese squares
- Crackers that don’t taste like cardboard
- Grapes
- A lil square of dark chocolate that I hide under the crackers so James doesn’t see it
2. The “I’m Trying to Be Healthy” Version

- Sliced turkey
- That fancy cheese James thinks I don’t know about
- Cucumber slices
- Cherry tomatoes (the good kind)
- Whole grain crackers that taste like punishment
3. The “I Wish This Was Pizza” Option
This one’s my favorite when I’m craving pizza but trying not to Doordash it for the 3rd time in a week:

Would you like to save this?
- Mini pitas
- Turkey pepperoni (or regular if you’ve given up on health like I periodically do)
- Mozzarella chunks
- Lil container of marina sauce that ALWAYS leaks no matter how carefully I seal it
- Some bell peppers to pretend it’s healthy
4. The Breakfast-for-Lunch Thing
Whoever decided breakfast food can only be eaten before noon was WRONG:
- Hard-boiled eggs (that I try not to overcook while scrolling TikTok)
- Cheese cubes
- Berries (if they haven’t gone moldy in the 2.7 seconds since I bought them)
- A few nuts if I’m feeling fancy
- Sometimes a mini muffin that I “made for the kids” but actually made for me
5. The “My Daughter Would Approve” Version
When Emma comes home and judges my food choices:
- Hummus (store-bought because WHO HAS TIME)
- All the veggies I can find
- Pita triangles
- Maybe some fancy olives if I’m feeling European that day
- She still complains that the container is plastic tho #cantwin
6. The “I Have No Time and Zero Energy” Default
For those mornings when I can’t even:
- Whatever lunch meat hasn’t expired
- Pre-sliced cheese (worth the extra $$ sometimes)
- The sad crackers from the back of the pantry
- An apple that’s thisclose to going bad
- Maybe a cookie because life is short and hard
7. The “It’s Been a Week” Friday Special

By Friday my lunch creativity is DONE:
- Peanut butter (the good kind that you have to stir, which I ALWAYS make a mess doing)
- Jelly in a tiny container (that also always leaks whyyyyy)
- Graham crackers
- Banana slices that will definitely be brown by lunch but whatevs
- Sometimes chocolate chips if I need therapy but can’t get an appointment
Pro Tips from Someone Who’s Made All the Mistakes
After making these for like 6 months now, I’ve learned some things the hard way:
- Those crackers WILL get soggy if you pack them with wet stuff. I don’t care what anyone says. Pack them separately or accept their sad, soggy fate.
- If you’re taking these to work, put your name on your containers!!! People WILL steal your food. Looking at you, Barbara from accounting who definitely took my turkey lunchable last month.
- Dips and sauces always leak. ALWAYS. Double wrap them or use containers with better seals than my marriage (jk James, if you’re reading this, which you’re not because you never read my blog).
- Don’t try to prep these for more than 3 days ahead unless you enjoy food poisoning. Ask me how I know this! (don’t actually ask me)
- If cutting up cheese and meat seems too hard, just buy the pre-cut stuff sometimes. Yes it costs more but sometimes sanity > money.
- Charlie (our golden retriever) can smell these from approximately 7 miles away and will destroy anything to get to them. Store accordingly unless you want another $600 vet bill for “foreign object removal” which is just fancy vet talk for “your dog ate a plastic container.”
Frequently Asked Questions that I Made Up Because No One Actually Asks Me Anything
Q: How long do these stay good in the fridge?
A: About 3 days before things start getting sketchy. Less if your fridge is like mine and randomly decides to be 10 degrees warmer on the bottom shelf for no reason.
Q: Are these actually cheaper than store-bought Lunchables?
A: YES. Like half the price or less, especially if you buy ingredients on sale. And you get way more food that actually tastes like food.
Q: Can I freeze these?
A: Parts of them, maybe? I tried freezing some components once and it was… not great. The crackers got weird and the cheese texture changed and then I just ended up ordering DoorDash anyway so what’s the point really?
Q: What containers should I use?
A: Anything with dividers! I use these bento box things I found online after seeing them in my targeted ads 500 times. But honestly any container works if you separate the wet and dry things (#lifelesson).
Q: My kids are picky and won’t eat these. Help?
A: Let them go hungry? Kidding! (Sort of.) Try cutting things into fun shapes if you have that kind of energy. I did this exactly once when Emma was 7 and she talked about it for YEARS so apparently it works.
Q: Are these healthy?
A: Healthier than the store ones for sure. And healthier than forgetting lunch and eating vending machine food at 2pm which is what I did all last year.
More Easy Recipe Ideas When You Can’t Even
If you’re into this whole “planning ahead” thing (which I’m trying to be now that I’m allegedly a grown-up), here are some other easy recipes that my chaotic brain can actually handle:
- Healthy Spinach Egg Muffins that I somehow always overcook but still eat anyway
- 4-Ingredient Chicken Salad because counting ingredients is about all the recipe complexity I can handle
- Peanut Butter Baked Oatmeal which my son actually requests when he visits (shocking)
- Street Corn Chicken Rice Bowl for when you’re feeling fancy but still lazy
For more lunchable inspo, check out this awesome guide from Less with Laur who is way more organized than I’ll ever be.

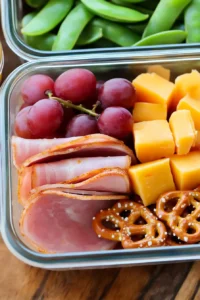
Ingredients
- 4 ounces deli-sliced ham or preferred high-quality deli meat
- 4 ounces cheddar cheese cubed or sliced
- 12 whole-grain crackers
- 1/2 cup fresh grapes
- 1/2 cup sugar snap peas or carrot sticks
Would you like to save this?
Instructions
- Slice or cube the cheese and portion out the ham.
- Wash and dry the grapes and sugar snap peas.
- Arrange the ham, cheese, crackers, and fruits in a divided container or bento box.
- Store in the refrigerator for up to two days.
- Add the crackers right before eating to keep them fresh and crunchy.
Notes
- For extra flavor: Add a small container of mustard, hummus, or ranch for dipping.
- Make it heartier: Include a handful of nuts or a hard-boiled egg for extra protein.
- For variety: Swap cheddar for Swiss or gouda, and try whole-grain pita chips instead of crackers.
- Classic Ham and Cheddar: Served with grapes and snap peas.
- Turkey and Provolone: Add cucumber slices and a side of pesto or ranch.
- Pepperoni and Mozzarella: Pair with pita slices and marinara sauce.
- Vegetarian Option: Use hummus, pita chips, and a mix of crunchy veggies.
- Meal prep containers with dividers
- Sharp knife for slicing cheese and meats
- Small containers for dips or spreads
Nutrition
Final Thoughts from a Perpetually Hungry Person
Listen, making your own lunchables might seem like one of those “Pinterest mom” things that normal humans can’t actually accomplish, but I PROMISE it’s doable even if you’re like me and have 5 unfinished home projects, a dog who’s currently eating a sock, and can’t remember if you took your thyroid meds this morning.
These little lunch boxes have legit saved me money, time, and the embarrassment of buying Hot Pockets at the gas station on my lunch break (again).
Give it a try and let me know how it goes! Or don’t and keep paying $5 for sad little trays of processed food. Your choice! But if you see me at Target with my cart full of cheese and fancy lunch containers, you’ll know what’s up.
Anyway gotta go—just realized I left my coffee in the microwave. Again. For the third time today. And it’s only 10am. #winning
— Lisa
P.S. What’s your favorite easy lunch? Tell me in the comments! Unless your answer is “salad” in which case please lie to me and say something more interesting.