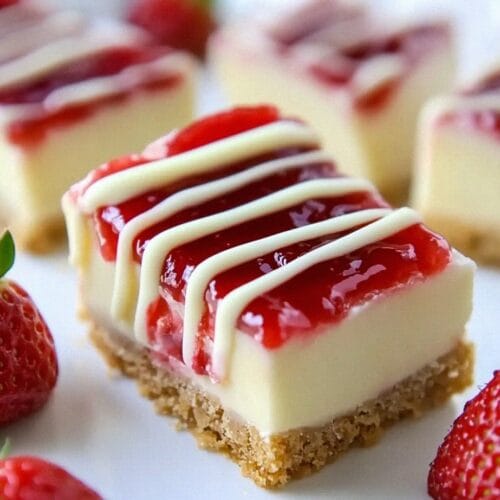
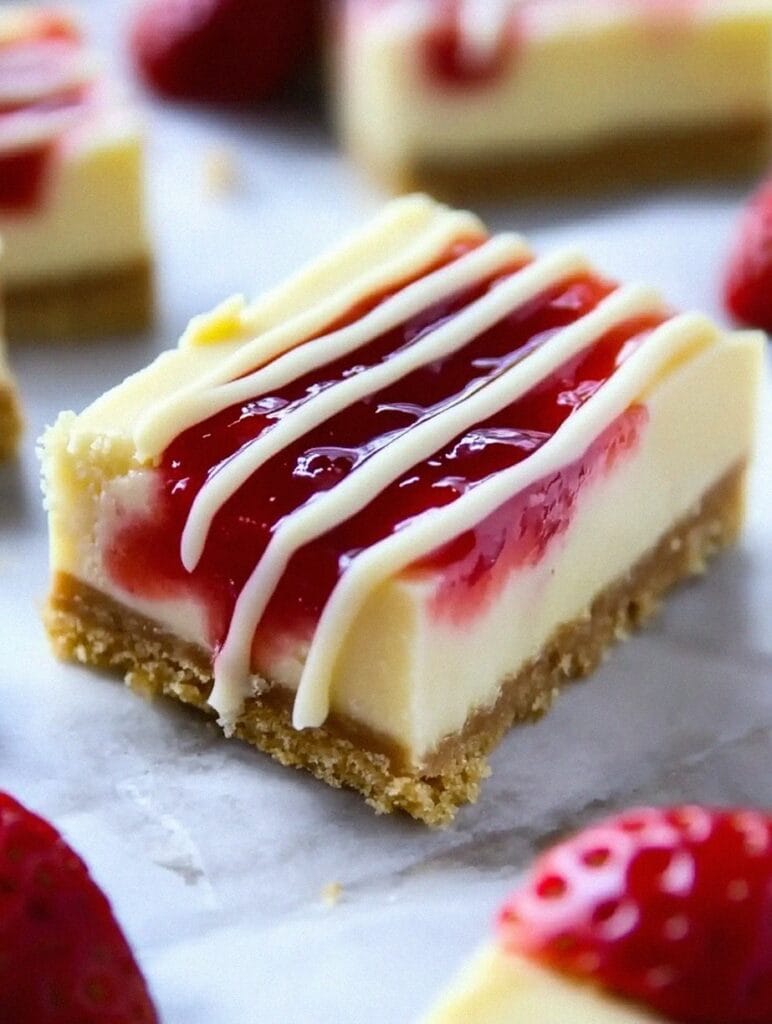
Okaaaay friends, let’s talk about STRAWBERRY CHEESECAKE BARS. Like, seriously. The most perfect little squares of heaven that have ever existed in my kitchen. And trust me, I’ve created some pretty epic disasters too! (more on that later)
Have you ever just wanted cheesecake but also didn’t want to spend 47 hours making it??? Me too! That’s where these magical bars come in—they’re basically cheesecake’s cooler, more laid-back cousin who still dresses nice for dinner but doesn’t make a whole thing about it.
So here’s the dealio. I was testing this recipe last Tuesday and my kitchen looked like a strawberry BOMB went off. Red everywhere! On the ceiling?!? Somehow yes. But these bars are sooooo worth the cleanup, I promiseeeee.
Why Strawberry Cheesecake Bars Are Your Next Favorite Dessert (Like, For Real Though)
Listen up dessert people!!! These bars are about to change your whole dang life and I am not even slightly exaggerating. They take everything amazing about traditional cheesecake and make it… idk… accessible? Is that the right word? Whatever, you know what I mean.
The Perfect Balance of Sweet and Creamy (Without Being Gross)
So imagine the most perfect bite of dessert. Got it? No wait, make it better. THAT’S these bars! The tangy cream cheese hits first, then the sweetness from the berries, then that buttery graham cracker base that just… ugh. I can’t even.
What makes these so special:
- The cream cheese filling is smoooooth as silk (not that I’ve eaten silk but you get it)
- Fresh strawberries that explode with flavor in ur mouth
- A graham cracker crust that doesn’t fall apart when u bite it (my personal victory!!!)
A Time-Saving Alternative to Traditional Cheesecake (For Those of Us With Lives)
Who has time for regular cheesecake?? Not me! Between running this blog and trying to remember where I put my coffee (it’s in the microwave, it’s ALWAYS in the microwave), these bars are my salvation.
Check out this comparison I made while stress-eating the edges of batch #3:
| Traditional Cheesecake | Cheesecake Bars |
|---|---|
| Takes foreeeever (like 2-3 hours of prep) | 45-60 mins TOTAL (including eating some batter) |
| Needs fancy springform pan thingy | Regular ol’ baking pan works fine |
| Cutting is a nightmare | Pre-cut squares = no mess no stress |
| Water bath nightmares | No water bath needed!!!! |
Year-Round Dessert Solution (Even When Berries Cost More Than My Car Payment)
I know what ur thinking… “but Lisa, strawberries aren’t always in season!” True dat. But here’s the secret… these bars are amazing with frozen berries too! I’ve made them in January when it’s so cold outside that my eyelashes freeze (Portland winters, amirite?) and they’re still incredible.
Essential Ingredients for Perfect Cheesecake Bars
Let’s get down to the nitty gritty detail stuff. You need good ingredients to make good food. Shocking revelation, I know!!! But seriously tho.
Here’s what you’ll need:
- Cream cheese (FULL FAT PLZ, this is not the time for diet food)
- Graham crackers (the honey ones are my fave but u do u)
- Fresh strawberries (or frozen if u must)
- Granulated sugar
- Large eggs from happy chickens
- Vanilla extract (the real stuff, not that fake nonsense)
- Unsalted butter (salted works too, I’ve used it when that’s all I had and just reduced the extra salt)
The cream cheese thing is super important. It MUST be room temp or you’ll be standing there with achey arms tryna beat out lumps for like 20 minutes and ain’t nobody got time for that. Ask me how I know. 😑
Here’s a handy chart I made after extensive “research” (aka making these wayyyy too many times):
| Ingredient | Quality Tip |
|---|---|
| Cream Cheese | Room temp!!!! And high-fat content or it gets weird |
| Strawberries | Look for bright red ones with no white cores or sad mushy parts |
| Eggs | Large ones, and let them come to room temp too if u remember (I often don’t lol) |
Pro tip for my special dietary peeps: You can totally use gluten-free graham crackers or those dairy-free cream cheeses. The texture is slightly different but honestly? still delish.
Step-by-Step Guide to Making the Graham Cracker Crust
Okayyy so the crust is kinda the foundation of this whole situation. If it’s bad, everything’s bad. No pressure!!!! Just kidding, it’s actually super easy.
I learned my graham cracker crust skills from my mom, who learned from her mom, who probably learned from the back of a box or something. But if you want the real deal perfect crust, check out this awesome guide on making the perfect graham cracker crust that I reference ALL the time.
Achieving the Perfect Crust Texture (Without Having a Breakdown)
Here’s my not-so-secret secret for a perfect crust: it’s all about the crush! You want graham cracker crumbs that are juuuuust right. Not too chunky, not too fine. Goldilocks vibes.
Some important crust pointers:
- Use fresh graham crackers for maximum crunchability
- Aim for uniform crumb size (but don’t stress if it’s not perfect, we’re not on a TV show)
- Mix those crumbs with melted butter and a touch of sugar until it looks like wet sand (appetizing description, I know)
Tips for Even Crust Distribution (Because Nobody Wants the Corner With No Crust)
Wanna know what separates the amateur bakers from the pros?? EVEN CRUST DISTRIBUTION. I’m not even joking. Nothing worse than getting a piece with barely any crust while someone else gets all of it.
I use the bottom of a measuring cup to press it all down. Works like a charm every. single. time. Press firmly but not like you’re trying to crush diamonds or anything.
Pre-Baking Secrets (That Nobody Tells You)
This might be controversial in some baking circles (yes those exist and yes they’re intense), but I am PRO pre-baking the crust. It adds this extra dimension of flavor and prevents the dreaded Soggy Bottom that Paul Hollywood is always going on about.
Bake at 350°F for 8-10 minutes until it’s juuuust golden. Then let it cool completely before adding your cheesecake layer.
Pro tip for potluck people: If u know you’re bringing these to a thing, pre-bake the crust the night before! Then you can just finish them up before the event and look all fancy and put-together (even if you’re secretly a hot mess like me).
Creating the Creamy Cheesecake Layer
This is where the magic happens people!!! The cheesecake filling is what makes or breaks these bars. And I’ve definitely broken a few batches learning the hard way.
Temperature is EVERYTHING when making cheesecake. Like, I cannot stress this enough. Take your cream cheese out of the fridge at least 30 minutes before you start mixing. Otherwise you’ll be there forever trying to smooth out those stubborn little lumps. Been there, done that, got the t-shirt, burned the t-shirt.
My non-negotiable cheesecake rules:
- Always use full-fat cream cheese (this is not the time to count calories friends)
- Beat that cream cheese until it’s completely smooth (no lumps allowed at this party)
- Add eggs one at a time, mixing gently after each (patience is a virtue I’m still working on)
- Do NOT overmix unless you want a cracked cheesecake (and you don’t)
Your mixing technique matters a ton here. Use a hand mixer on low speed and scrape down the sides of the bowl like ALL THE TIME. Seriously. I think I spend half my life scraping down the sides of mixing bowls.
Wanna take these bars from good to OMG THESE ARE AMAZING? Add a lil’ something extra like vanilla bean paste instead of extract or a bit of lemon zest. These tiny touches make a huge difference! I once added orange zest by accident (thought it was lemon) and it was actually delicious????
Remember that your goal is smooth and creamy cheesecake. Not fluffy, not airy, not lumpy. SMOOTH. If you follow these steps, I promise your cheesecake will be a thing of beauty. Or at least deliciousness, which is more important anyway.
Fresh Strawberry Topping Techniques
The strawberry part of strawberry cheesecake bars better be AMAZING, right?? Right!!! This is where you can really make these bars stand out. A good strawberry topping makes people go “mmmMMMMmmm!” instead of just “mmm.”
Selecting the Best Strawberries (Without Being That Weirdo Sniffing All the Berries)
Picking strawberries is an art form, I swear. Here’s what to look for:
- Bright red berries with zero white or green spots
- Firm but with a little give (like a good avocado)
- They should smell like actual strawberries (revolutionary concept, I know)
- No sad mushy spots or weird bruises
I’ve definitely been that person standing in the produce section for 20 minutes examining strawberries. No shame in my berry game.
Preparing Your Strawberry Swirl (Without Turning Your Kitchen Into a Crime Scene)
Making a strawberry swirl that’s both pretty AND tasty requires some finesse. Here’s my approach:
- Wash those berries super well (pesticides = no thanks)
- Cut off the tops and any weird parts
- I like to dice mine pretty small but you do you
- For a swirl, puree some berries in a blender until smooth
Would you like to save this?
The trick to a good swirl is using the back of a spoon to make little divots in your cheesecake batter, then spooning the puree into those spots. Then grab a toothpick or knife and swirl away! Don’t overdo it tho or you’ll just have pink cheesecake (which is also fine tbh).
Alternative Fruit Options (For When You Just Can’t With Strawberries)
Listen, I get it. Sometimes you’re just not in a strawberry mood. Or maybe strawberries are $97 a container (slight exaggeration but BARELY). Here are some other fruits that work amazingly well:
| Fruit | Flavor Profile | Best Pairing |
|---|---|---|
| Raspberries | Tart and zingy | Dark chocolate cheesecake base |
| Blueberries | Sweet and chill | Lemon cheesecake (sooo good) |
| Peaches | Smooth and summery | Vanilla bean cheesecake |
Pro tip: Always taste your fruit before using it! There’s nothing worse than making a beautiful dessert with flavorless berries. Better to know beforehand and add a lil’ extra sugar if needed.
Storage and Make-Ahead Tips for Strawberry Cheesecake Bars
These bars are PERFECT for making ahead of time, which is great for those of us who are perpetually running late to every social gathering ever. Not that I’m speaking from personal experience or anything…
For keeping them fresh:
- Store in an airtight container (otherwise they absorb fridge smells and nobody wants cheesecake that tastes like leftover curry)
- They’ll stay good in the fridge for up to 5 days (if they last that long, which they won’t)
- If stacking, put parchment between layers unless you want them stuck together forever like some kind of cheesecake-human centipede situation (sorry for that mental image)
Freezing is also totally an option! Here’s how:
- Let them cool COMPLETELY first (v important)
- Wrap each bar individually in plastic wrap (yes it’s annoying but worth it)
- Pop them in a freezer container or bag
- They’ll keep for about 2 months frozen
Pro tip that I learned the hard way: Thaw frozen bars in the fridge overnight. Don’t be impatient and microwave them like I did that one time. Just… trust me on this.
For the super planners among us (teach me your ways), you can make the crust and filling up to two days ahead and keep them separate in the fridge. Then assemble and bake right before your event. Fresh-baked vibes without the day-of stress!
| Storage Method | Duration | Best Practices |
|---|---|---|
| Refrigerator | 5 days | Airtight container, covered |
| Freezer | 2 months | Individually wrapped, no air exposure |
Troubleshooting Common Issues When Making Cheesecake Bars
Even as someone who makes these ALL THE TIME, I still run into problems. It happens to everyone! Here’s how to fix the most common issues:
Preventing Cracks and Bubbles (The Bane of My Existence)
There’s nothing more devastating than pulling your beautiful bars out of the oven and seeing a Grand Canyon-sized crack forming. To avoid this tragedy:
- Room temperature ingredients are non-negotiable (I cannot stress this enough)
- Don’t overmix or you’ll incorporate too much air
- Bake at a moderate temp (325°F is my sweet spot)
- Use a water bath if you’re feeling fancy (but tbh I usually skip this and it’s fine)
Fixing Texture Problems (When Your Cheesecake Is Just… Off)
Texture issues are the worst because you don’t know until you bite in. For better texture every time:
- Make absolutely sure your cream cheese is fully softened and smooth before adding other ingredients
- Mix slowly and gently (this isn’t a race)
- A stand mixer gives more consistent results (but a hand mixer works too)
- For ultra-smooth cheesecake, you can actually strain the mix through a fine-mesh sieve (extra work but sometimes worth it)
Adjusting Sweetness Levels (Because Not Everyone Has My Sweet Tooth)
Sweetness is such a personal preference. Here’s how to adjust:
| Issue | Solution |
|---|---|
| Too Sweet | Reduce sugar by 2-3 tablespoons next time (and maybe add a pinch of salt) |
| Not Sweet Enough | Drizzle with honey or maple syrup for depth of flavor |
| Balanced Flavor | Use really ripe, fresh strawberries to naturally balance sweetness |
Remember, baking is partly science but also partly art. Every time you make these bars, you’ll get better at knowing exactly how YOU like them. That’s the fun part!
Conclusion
Well friends, we’ve reached the end of our strawberry cheesecake bar journey! What a wild ride, huh? From crust catastrophes to swirl successes, making these bars is an adventure worth taking.
With all these tips and tricks, you’re now fully equipped to create strawberry cheesecake bars that’ll make your friends think you secretly went to pastry school or something. These little squares of joy are perfect for literally any occasion—from fancy dinner parties to “it’s Tuesday and I need cheesecake” moments (which are totally valid btw).
Feel free to experiment and make these bars your own! Add different extracts, try new fruit combos, maybe even sprinkle something crunchy on top? The possibilities are endless, and that’s what makes baking so fun.
Now go forth and create some strawberry cheesecake magic! And when your kitchen inevitably looks like a tornado of cream cheese and graham crackers hit it, just remember: it’s all part of the process. A delicious, messy, wonderful process.
More Recipes You’ll Love
If you enjoyed these strawberry cheesecake bars, I just KNOW you’ll love these other treats from my kitchen:
- Sweet and Tangy Strawberry Butter – The perfect spread for your morning toast that tastes like summer in a jar!
- Mini Cinnamon Roll Cheesecakes – All the goodness of cinnamon rolls AND cheesecake in adorable single servings.
- Healthy Chocolate Chip Oatmeal Bars – For when you want something sweet but also need to pretend it’s kinda healthy.
- Strawberry Cheesecake Bars Recipe – If you need the printable version of this recipe with exact measurements!
FAQ
How long can I store strawberry cheesecake bars in the refrigerator?
You can keep these bars in an airtight container in the fridge for up to 5 days. Just make sure they’re well-covered so they don’t absorb other food smells (nobody wants cheesecake that tastes like last night’s garlic chicken).
Can I use frozen strawberries instead of fresh ones?
Absolutely! Frozen strawberries work great, especially when fresh berries are out of season or cost more than my monthly coffee budget. Just make sure to thaw and drain them really well first, otherwise you’ll end up with soggy bars.
Are strawberry cheesecake bars suitable for gluten-free diets?
Yes! Simply swap the regular graham crackers for gluten-free ones (there are several good brands available). Just double-check that all your other ingredients are certified gluten-free if you’re making these for someone with celiac disease.
Can I make these bars in advance for a party?
These bars are PERFECT for make-ahead situations! You can prepare them up to 2 days before your event and store them in the refrigerator. Some people (myself included) think they actually taste better after a day, when the flavors have had time to get friendly with each other.
What’s the best way to cut clean, neat bars?
For picture-perfect cuts, use a sharp knife dipped in hot water and wiped clean between slices. Also, refrigerate the bars for at least 2 hours before cutting – cold cheesecake cuts much more cleanly than room temperature.
Can I freeze strawberry cheesecake bars?
Yes! Wrap individual bars in plastic wrap, then in foil, and they’ll keep in the freezer for up to a month. Thaw overnight in the refrigerator for best results – don’t be impatient and microwave them unless you enjoy cheesecake soup.
How can I tell if my cheesecake bars are fully baked?
The center should be almost set but still have a slight jiggle when you gently shake the pan – think Jell-O, not liquid. They’ll continue to set as they cool. Generally, baking at 325°F for 25-30 minutes does the trick, but every oven is different.
Are there any variations I can try with this recipe?
SO MANY! Try blueberries or raspberries instead of strawberries, add lemon or orange zest to the filling, swap the graham crackers for gingersnaps or chocolate cookies… the possibilities are endless! My personal fave variation is adding a thin layer of chocolate ganache on top after they’ve cooled. Because chocolate makes everything better!